Showing posts with label Cisco. Show all posts

Thursday, 15 September 2022

Cisco UCS CIMC Flash issue workaround

 If you haven't upgraded the CIMC version then you'll have difficulties accessing the server. The following workaround might help overcoming the situation.

(Adjust the url to your environment)


https://<CIMC_IP>/kvm.jnlp?cimcAddr=<CIMC_IP>&tkn1=<CIMC_username>&tkn2=<CIMC_Password>

 This would download a jnlp file that will open a KVM connection to the server. If you face issues connecting to Java KVM then edit the downloaded jnlp file and add the real username and password in the relevant arguments.


References:

https://community.cisco.com/t5/cisco-bug-discussions/cscvs11682-c220-c240-m3-server-need-html5-support-for-cimc-webui/td-p/4144939

Friday, 25 February 2022

Firepower FMC delete stuck deployments from CLI

 Sometimes you get a deployment running for hours and you cannot clear the state even with an FMC reload.

Login to FMC CLI and perform the following

expert

sudo su

Now check that the task is actual there using the following command

OmniQuery.pl -db mdb -e "select status,category,hex(uuid),body from notification where status=7;"

Use the following command to clear the pending deployment

OmniQuery.pl -db mdb -e "update notification set status=13 where status=7;"

If you want to delete the task use the following command, replacing the uuid value with the one that you want to delete

OmniQuery.pl -db mdb -e 'delete from notification where uuid=unhex("bb0bba970b4c4423927b8f7d237edd0b");'

Friday, 10 December 2021

Cisco IOS DHCP with VRF

 Configuring a Cisco router as DHCP Server for a VRF, you must use the "vrf" keyword in the pool and in the excluded ranges.

ip dhcp excluded-address vrf INFO 172.23.11.1 172.23.11.10
ip dhcp excluded-address vrf INFO 172.23.11.250 172.23.11.254
ip dhcp pool INFO_VL112
 vrf INFO
 network 172.23.11.0 255.255.255.0
 default-router 172.23.11.254
 dns-server 1.1.1.1 8.8.8.8
 domain-name lab.local
 lease 0 2


 In order for DHCP requests to be served the following commands must be entered on DHCP Server Router


For remote devices:
ip dhcp use vrf remote

For locally connected clients:
ip dhcp use vrf connected

Wednesday, 2 December 2020

VPN IPSEC Replay errors

 Sometimes you see erros like this on a Cisco router.

 %IOSXE-3-PLATFORM: R0/0: cpp_cp: QFP:0.0 Thread:000 TS:0002185922034562192 %IPSEC-3-REPLAY_ERROR: IPSec SA receives anti-replay error, DP Handle 13, src_addr <A.A.A.A>, dest_addr <B.B.B.B>, SPI 0x3caaaeb7


If you know that these packets are legitimate packets from your VPN endpoints, it means that some mechanism changes the order of the packets and these causes packet drops on the receiving end. 

In order to overcome this one can apply the following command in order to increase the IPSec receive window.

crypto ipsec security-association replay window-size 1024


Cisco Reference:

https://www.cisco.com/c/en/us/td/docs/ios-xml/ios/sec_conn_dplane/configuration/15-mt/sec-ipsec-data-plane-15-mt-book/sec-ipsec-antireplay.pdf

Wednesday, 17 June 2020

Firepower check Security Intelligence feed contents

You can view the list of Security Intelligence IP addresses from the CLI of the Defense Center. You'll want to issue the following commands after logging in:

1. sudo su

2. cd /var/sf/iprep_download

In this directory, there is a file called rep_dd.yaml. You can view this text file to find the UUID associated with each category, such as "attackers".

There should be a file in the /var/sf/iprep_download directory named for that UUID, for example 5a0b6d6b-e2c3-436f-b4a1-48248b330a26. You can view this file using the "less" command in order to see the IP addresses that are currently included for that particular category.

Friday, 10 April 2020

Cisco WLC Administrator Radius authentication

In order to authenticate a user via a RADIUS server, for controller       login and management, you must add the user to the RADIUS database with the       IETF RADIUS attributes Service-Type attribute set to the appropriate value       according to the user's privileges.
  • In order to set read-write privileges for the user, set the           Service-Type Attribute to Administrative.
  • In order to set read-only privileges for the user, set the           Service-Type Attribute to           NAS-Prompt.
  • For Lobby Ambassador you have to return IETF RADIUS Service-Type attribute set to Callback       Administrative.
Please find config example:
http://www.cisco.com/en/US/tech/tk722/tk809/technologies_configuration_example09186a0080782507.shtml.

Thursday, 28 November 2019

IKEv1 VPN messages

All Credits for this go to Jack Rhysider and his excellent work at https://www.tunnelsup.com/ and https://darknetdiaries.com/

ISAKMP (IKE Phase 1) Negotiations States

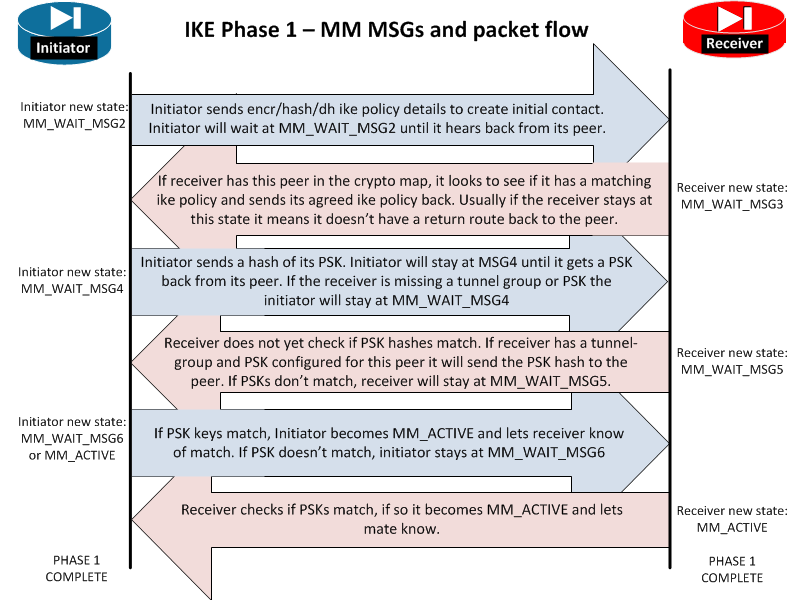
The MM_WAIT_MSG state can be an excellent clue into why a tunnel is not forming. If your firewall is hanging at a specific state review this graph below to find where along the path the VPN is failing.

ASA ISAKMP STATES

IKE Phase Messages - IMG
Graph source: tunnelsup.com
These are the possible ISAKMP negotiation states on an ASA firewall. ISAKMP stands for: The Internet Security Association and Key Management Protocol
  • MM_WAIT_MSG2 Initiator Initial DH public key sent to responder. Awaiting initial contact reply from other side. Initiator sends encr/hash/dh ike policy details to create initial contact. Initiator will wait at MM_WAIT_MSG2 until it hears back from its peer. If stuck here it usually means the other end is not responding. This could be due to no route to the far end or the far end does not have ISAKMP enabled on the outside or the far end is down.
  • MM_WAIT_MSG3 Receiver Receiver is sending back its IKE policy to the initiator. Initiator sends encr/hash/dh ike policy details to create initial contact. Initiator will wait at MM_WAIT_MSG2 until it hears back from its peer. Hang ups here may also be due to mismatch device vendors, a router with a firewall in the way, or even ASA version mismatches.
  • MM_WAIT_MSG4 Initiator Initiator is sending the Pre-Shared-Key hash to its peer. Initiator sends a hash of its PSK. Initiator will stay at MSG4 until it gets a PSK back from its peer. If the receiver is missing a tunnel group or PSK the initiator will stay at MM_WAIT_MSG4
  • MM_WAIT_MSG5 Receiver Receiver is sending its PSK hash to its peer. Receiver does not yet check if PSK hashes match. If receiver has a tunnel-group and PSK configured for this peer it will send the PSK hash to the peer. If PSKs don’t match, receiver will stay at MM_WAIT_MSG5. I have also seen the tunnel stop here when NAT-T was on when it needed to be turned off.
  • MM_WAIT_MSG6 Initiator Initiator checks if PSK hashes match. If PSK keys match, Initiator becomes MM_ACTIVE and lets receiver know of match. If PSK doesn’t match, initiator stays at MM_WAIT_MSG6. I have also seen the tunnel stop here when NAT-T was on when it needed to be turned off. However, if the state goes to MSG6 then the ISAKMP gets reset that means phase 1 finished but phase 2 failed. Check that IPSEC settings match in phase 2 to get the tunnel to stay at MM_ACTIVE.
  • AM_ACTIVE / MM_ACTIVE The ISAKMP negotiations are complete. Phase 1 has successfully completed.

PIX ISAKMP STATES

    • MM_NO_STATE
ISAKMP SA has been created but nothing else has happened yet.
    • MM_SA_SETUP
The peers have agreed on parameters for the ISAKMP SA.
    • MM_KEY_EXCH
The peers have exchanged Diffie-Hellman public keys and have generated a shared secret. The I SAKMP SA remains unauthenticated.
    • MM_KEY_AUTH
The ISAKMP SA has been authenticated. If the router initiated this exchange, this state trans itions immediately to QM_IDLE and a Quick mode exchange begins.
    • AG_NO_STATE
The ISAKMP SA has been created but nothing else has happened yet.
    • AG_INIT_EXCH
The peers have done the first exchange in Aggressive mode but the SA is not authenticated.
    • AG_AUTH
The ISAKMP SA has been authenticated. If the router initiated this exchange, this state transitions immediately to QM_IDLE and a Quick mode exchange begins.
    • QM_IDLE
The ISAKMP negotiations are complete. Phase 1 successfully completed. It remains authenticated with its peer and may be used for subsequent Quick mode exchanges.

What is the difference between MM and AM?

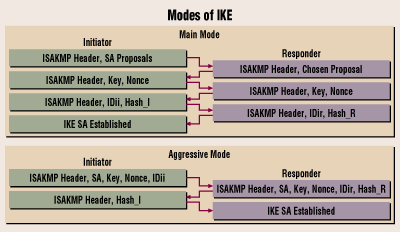
Main mode vs Aggressive mode. Here is a image taken from Cisco’s website to show the difference.
MM AM - IMG
As you can see the Main mode is the same as the flowchart at the top of the page. Aggressive mode only uses 4 steps to establish the tunnel.

Troubleshooting ISAKMP Or Phase 1 VPN connections

When troubleshooting VPNs, a very common problem is phase 1 not establishing correctly. Here’s a quick checksheet to make sure you have the configuration correct.
  • Verify ISAKMP parameters match exactly.
  • Verify pre-shared-keys match exactly.
  • Check that each side has a route to the peer address that you are trying to form a tunnel with.
  • Verify ISAKMP is enabled on the outside interfaces.
  • Is ESP traffic permitted in through the outside interface?
  • Is UDP port 500 open on the outside ACL?
  • Some situations require that UDP port 4500 is open for the outside.

Tuesday, 12 November 2019

Firepower VPN Filter via Flexconfig


The following information provided as is with not guaranties  that it works and support will not be provided! Test in a lab before deploying in production.

If you don't know what you're doing hire a trained engineer!


VPN filter for Site to site VPN is not supported from GUI in Firepower. see CSCvj86972


You have to create a new policy and attach it to tunnel-group.
Create your VPN configuration and save it.

Assuming that Remote VPN peer IP = 10.10.10.10

Do the following:


1) Under objects create an extended access list to be used as VPN Filter with the name VPN_FILTER, this ACL is your actual VPN filter and will be attached to your VPN tunnel.


2) On the same page under Flexconfig-> Text Object Create a new text object for your tunnel group IP as Single and assign a value of 10.10.10.10 (replace with your peer IP)


3) Under Flexconfig Object create a new object with Deployment: "Everytime" and Type: "Append"


4) Insert a new policy object -> Extended ACL object and choose your created ACL


5) Insert a new policy object -> Text Object and choose your previously created "TUNNEL_GROUP"


6) Copy and paste the following to flex config window
    Note: adjust any vpn attributes here except the vpn-filter value

group-policy VPN_FILTER_POL internal
group-policy VPN_FILTER_POL attributes
 vpn-idle-timeout 30
 vpn-idle-timeout alert-interval 1
 vpn-session-timeout none
 vpn-session-timeout alert-interval 1
 vpn-filter value $VPN_ACL
 vpn-tunnel-protocol ikev1 ikev2

tunnel-group $VPN_TUNNEL general-attributes
 default-group-policy VPN_FILTER_POL

Your config should look like this


7) Now attached the configured policy to you flex config for the specific device under Devices -> FlexConfig (If you dont have a policy create a new one, assign it to the proper device and insert the FLEX_VPN_FILTER found in user defined policies).


8) Save and deploy!


Thursday, 7 November 2019

Change FTD management default gateway

Use the following in expert mode to disable gateway via data interfaces:
vi /etc/sysconfig/network-scripts/ifcfg-internal-route and changed the INTERNAL_ROUTE_ENABLED=1 to INTERNAL_ROUTE_ENABLED=0

Exit Expert mode.  Then issue a configure network ipv4 manual 1.1.1.2 255.255.255.0 1.1.1.1 to reconfigure the management IP.

The show network command now shows the gateway.

Wednesday, 6 November 2019

Catalyst 9300 iPerf Docker app

Follow this guide for iPerf docker install on Catalyst 9300

https://community.cisco.com/t5/networking-blogs/network-performance-monitoring-with-catalyst-9300-application/ba-p/3868481

Note:
Execute the command " iperf.exe – c  <IP address of the server>   -P 10  -w 1000k "
  (  -P refers to the number of parallel TCP streams and –w referes to the TCP window size  )

Thursday, 20 June 2019

FTD RA VPN with Microsoft NPS server


 ORIGINAL POST FROM Jatin Katyal  (Thanks)

Introduction
Steps needs to be followed on the Microsoft Radius server to configure group-lock and tunnel-group-lock
Configuration Steps

    Go to Remote Access Policies.
    Go to the remote access policy/network policy, make a right click on the policy and click on the "Properties"
    Click on Edit Profile.
    Click on Advanced Tab settings and add ( For IAS)
    Click on settings (For NPS)
    Scroll down to "Vendor-Specific" Radius attribute.
    Select it, from scroll down use custom and click on Add.
    Make sure Attribute Number is set to 26.
    Click on Add.
    Enter Vendor Code: 3076.
    Select radio button : Yes. It confirms.
    Click on Configure Attributes.
    Vendor-Assigned attribute number: 25 (group-lock) and 085 (tunnel-group-lock)
    Attribute format: String.
    Attribute Value: <group-policy-name> or <tunnel-group name>
    Apply.

In order to troubleshoot any issues look at event-viewer logs on Radius server.
Configure NPS Event Logging
NPS Events and Event Viewer

Finally, this document with ASA AAA configuration documentation could be useful too:
http://www.cisco.com/c/en/us/td/docs/security/asa/asa91/configuration/general/asa_91_general_config/aaa_radius.pdf

Wednesday, 10 April 2019

CUCM diagnose test

A quick and easy CUCM diagnostic test run via CLI.

utils diagnose test

Wednesday, 13 March 2019

Cisco VM ESXi wont boot (After restart)

Well, another day another bug!

Cisco bug CSCvh55176 for the official page.


I setup Unity connection fresh install on BE6K with ESXi 6.5. VM booted and worked properly, but after restart the VM didn't boot again and had only a black screen with a cursor, no messages, nothing..

A colleague run into this bug before me so I was provided with the resolution below:

You will need to:

-        boot VM with recovery ISO
-        Once the options appear, press ALT+F2. This will take you to bash prompt.
-        chroot /mnt/part1
-        /usr/bin/vmware-config-tools.pl -d
-        You may ignore the errors at the end
-        Exit and disconnect the ISO and make sure you will change the boot order again in BIOS

After above other VMs should be boot as well.

Tuesday, 13 November 2018

Cisco FMC FTD user to IP mapping troubleshooting

To check whether user to IP mapping works correctly, SSH to FMC and FTD and run the following commands in order to check if the entries are there

expert
user_map_query.pl -i 10.10.10.10 (to check for IP to user mapping)
user_map_query.pl -u bob (to check user to IP mapping)
If results display "For policy = 1" then this is set to propagate to FTD


Another approach
expert
u2dump /var/sf/user_enforcement/user_ip_map.* > /var/tmp/user-ip-map.dump
vi /var/tmp/user-ip-map.dump 


Credit for some of the above goes to dependencyhell.net blog.

Monday, 12 November 2018

Anyconnect DNS issues on VPN

If you 're facing troubles with clients connecting to VPN and can't resolve DNS please check the following

https://bst.cloudapps.cisco.com/bugsearch/bug/CSCuz27826/?rfs=qvred

In short
Anyconnect creates a static route on the client for the DHCP server. if your DHCP server also servers as DNS etc. this breaks the DNS resolution for your client.
Apply the following as workaround

group-policy DfltGrpPolicy attributes
  webvpn
     anyconnect-custom-attr no-dhcp-server-route
     anyconnect-custom-data no-dhcp-server-route no-dhcp-server-route true

group-policy <XXX> attributes 
  anyconnect-custom no-dhcp-server-route value no-dhcp-server-route

Friday, 28 September 2018

Jabber move to mobile

Hi, this is a sort guide on how to setup move to mobile.
This feature is available only for Android and iOS Jabber, not for Windows etc.

First create a Mobility Profile, Call Routing -> Mobility -> Mobility Profile.

This is a global setting.


Go to end user and assign mobility for the user needed

Then go to device configuration and make sure for the following

  1. Assign a softkey template that has Mobility key assigned on "On Hook" and "Connected", Create on if needed.
  2. Assign the English United States on User Locale (Required as stated)
  3. Assign an Owner ID and Mobility user ID
  4. Assign a CSS that allows you to reach the mobile number on "Rerouting Calling Search Space"
  5. On "Transfer to Mobile Network" select "Use Mobility softkey (user Receives Call)"
  6. On "Dial via Office" select Enable
  7. On "Associated Mobility Identity" create a new mobility as follows

Apply configuration and logoff - login from mobile jabber and test.

Cisco reference
https://www.cisco.com/c/en/us/td/docs/voice_ip_comm/jabber/11_6/cjab_b_feature-configuration-for-cisco-jabber/cjab_b_feature-configuration-for-cisco-jabber_chapter_0100.html#CJAB_TK_S6472988_00

Tuesday, 18 September 2018

CiscoAP1832i U boot recovery

Enter the U boot environment bit hitting ESC during boot.

use printenv and setenv (set doesn't accept  =) commands to boot from TFTP. (Usually change IP address of AP and TFTP, filename to boot part.bin from convert lightweight to autonomous)
then use: bootipq tftp